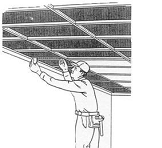
soundproofing ceiling tile installation
Sound Barrier Ceiling Tile is a double duty soundproofing ceiling tile. It works for both lowering sound transmission as well as reducing reverberation.
These ceiling tiles are designed to be dropped into an existing ceiling grid system. When it is necessary to cut the tiles to fit existing openings, follow the following steps

Measure your ceiling grid opening. Be sure to measure from inside to inside, then deduct 1/8″ from your results. This will allow the tile to slip into the grid with ease.

Lay the tile on a clean and smooth surface and mark off your measurements on the back of the tile. Use a straight edge (preferably metal) as a guide for a sharp razor tool. Cut the tile, a couple of passes maybe required.

Drop the cut tile into your grip system
Material typically required completing installation: Noise Barrier Ceiling Tiles, standard T-grid system
1. The Noise Barrier Ceiling Tiles (NBCT) are die cut to fit into a standard T-grid system, on top of existing ceiling tiles.
2. Lay individual NBCT’s on top of existing ceiling tiles.
a. You can leave the existing ceiling tiles in place or you can remove the existing ceiling tiles, place the NBCT on top and re-install the existing ceiling tile (with the NBCT now on top)
